
Joebama American citizens 2024 print
2 years ago
It's time to take a break from politics. So I'm posting a step-by-step tutorial on painting a Tau Fire Warrior in my Ice Planet theme. I prefer to paint the pieces first, then glue them together. This allows me to get into the little nooks and crannies that form when you assemble the Fire Warrior. The only pieces I've glued together are the torso to the legs, since that doesn't cover anything. Here's a Fire Warrior fresh off the sprue.
I start by base coating the model with black primer. I prefer black to white primer, since I layer and dry brush up from a dark base to create the shadows in the model. White works better if you start with a light base and then use inks or washes to create the shadows. Since the jumpsuit of the Fire Warrior is black, I do a light dry brushing of Codex Grey over cloth of the model. It's a very subtle highlighting of the pleats in the clothing. I use Citadel Paints, since that's what was at the store when I bought my models, and I've stuck with them to keep consistent colors.
The next step is to paint the gloves, boots, rifle barrel, grenades, antenna, and Tau symbol Regal Blue. This provides the foundation layer of all the blue in the model. Note that on the gun barrel, I've left the seems black.
Now I do a heavy dry brushing of Ultramarines Blue on the gloves and boots. This gives them a nice, icy blue color while leaving shadows in the recesses. Because the model is so small, it is necessary to paint the shadows into the recesses and folds in order for it to be noticeable when viewing at a distance. I layer the rest of the dark blue with Ultramarines Blue. Since the rest of the blue is over hard plates, I leave a sharp, defining edge, rather than blending into dark.
Now I paint the main armor and backpack Codex Grey. Again, since the armor is a hard material, I leave a sharp edge, rather than shading, which is best used on natural materials, like cloth, flesh, or fur.
Next I do a layer of Skull White over the Codex Grey. This should be a smooth, solid white. I paint it on pretty thick so that none of the grey shows through.
Most of the painting is complete. What's left are the glowy bits. These are done in neon orange, just like the Ice Planet LEGOS. Parts of the antenna, the photon grenades, and the lenses on the rifle and helmet are painted this way. The first part of this is to paint them Scab Red.
Next I layer them with Blazing Orange. The layering here is a bit more exaggerated than in the rest of the model. For the larger glowy surfaces, there should be a bit of Scab Red on the edges.
Add a third layer, this time of Fiery Orange. This should very obviously only cover part of the Blazing Orange. Follow the contour of the surface getting painted, shifted to one side as though light were reflecting off of it.
The last step in painting. On the largest glowy surfaces, the large lens in the helmet and the power globe on the rifle, put a tiny dot of Skull White. This is the specular reflection off the glassy surface, and makes it look brighter and more reflective. This dot should be on the Fiery Orange, off to one side, based on the contours of the surface. Think of how light reflects off a Christmas ornament. This is also the point where I paint the Tau sept markings onto the Fire Warrior. I use Brazen Brass, and put markings on the right side of the helmet and rifle barrel, as well as the bottom of the left shoulder plate. I give all the Fire Warriors in a single squad the same sept markings.
That's it. The model is fully painted. Now, it is time to assemble the Fire Warrior. Glue the body to base (I've prepared a base ahead of time) and glue the antenna to the helmet.
Next glue the backpack to the model. If you are using a standard white glue, you will have to wait for the glue to dry between these steps, to prevent knocking parts off while you try to add new parts.
Glue the arms and rifle to the body.
Lastly, glue the grenade pack and head to the body.
The Fire Warrior is finished, and ready to charge into the fight. For the Greater Good!
Plodding right along on my Tau force, I have completed my first stealthsuit. This is an older XV15 model that Games Workshop has discontinued. I got it from my friend's brother-in-law, along with a bunch of other Tau models. This particular model is a Shas'vre, equipped with a bonding knife and markerlight.
Stealthsuits are equipped with stealth field generators that distort their image and make them more difficult to see (and thus shoot at). I wanted some way to mark that the models are cloaked, rather than just painting them like the rest of my infantry. One way that I had seen was to dry brush the model the same way you dry brush the base, so that it blends in with the terrain that your army is mounted on. Some of the better ones had the stealthsuits phasing in and out, with half the model painted normally, and the other half cloaked.
However, I wasn't really sold on the idea, and I didn't want something that was only half stealthed. So I decided to give my stealth units a camouflage scheme. I painted the model the army's blue, rather than the standard white of my infantry, then painted a mottled pattern over top. It came out a lot better than I thought it would.
I have finished my first XV8 Crisis Battlesuit. As the battlesuits are infantry, I have painted them much like my Fire Warriors. This particular suit is in a Fireknife configuration, equipped with a plasma rifle, missile pod, and multi-tracker.


I have modelled this one in flight, cruising in to the fire zone. This represents the Tau's jump-shoot-jump tactic, and makes for a more interesting model.
For comparison, I have placed a Fire Warrior next to the Crisis suit. The Crisis suit is quite a bit bigger than a Tau, though this one looks even larger since it is hovering off the ground. I'm really liking the way this army is turning out.
After many months, I have finally finished my Devilfish Troop Carrier. I painted the ship blue with lots of white trim and panels, in keeping with my Ice Planet theme. Whereas my infantry have white armor over black jumpsuits, I wanted the vehicles to be a little different, so they would stand out better.
A rear view.
And a profile shot.
I'm going to go back to working on infantry for a while now. Even in batches, they are quicker to build than vehicles. This puts my total army at 1 Devilfish, 8 Fire Warriors, and 2 Gun Drones (not counting the ones on the Devilfish). I have a long way to go.
This past weekend, I started building a table top for Warhammer. My friends and I had previously just marked out a four foot by six foot space on the floor and played, but I decided it was time to actually make a gaming surface. So I went out last weekend and got all the supplies I needed, shanghaiing a friend with a truck to haul it all over to my dad's place. Dad has all the tools.
Warhammer is usually played on a six foot by four foot area, so the table top itself is a sheet of 1/2 inch thick MDF cut down to that size. I framed the whole table with 2x2. To make storage easier, since I don't have a space where I can just leave it out, I cut the whole thing in half and set it on hinges so it will fold up and I can put it away.
I still need to put some kind of terrain on the table top. I'm thinking of making this table for my Tau army, so this will be a snow covered table. Eventually, I'll make a second one for my Empire (fantasy) army, which is the more typical grassy terrain. I also need to get some legs made for the table, so we can stand up and play. Right now I'm thinking of keeping them separate, so I can swap out table tops. But that's all a project for another day.
Here are a few pictures showing the table.
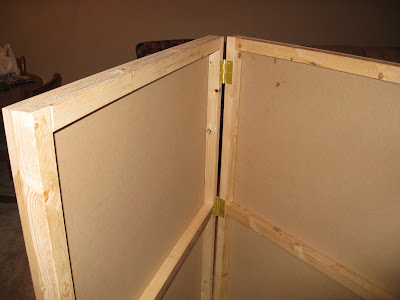

This all took only a couple hours to make. It's a fairly simple design, and Dad had all the appropriate saws and drills and other tools. He's something of a handy man, so he's collected quite a few along the way. It made for a good father-son project, and of course we celebrated by going out to happy hour. It's good to be able to build things yourself.
About a month ago I started working on a Tau army for Warhammer 40K. I had been working on a fantasy army (the Empire) for several years and felt it was time to make a sci-fi force.
As I enjoy the painting and modeling that goes with the hobby as much as actually playing the game (I spend way more time painting than playing) I chose my army based off how it looks. Basically, which army had the coolest models. Several armies have awesome models, and I eventually went with the Tau since they are the most high tech, sci-fi, space models in the game. (After the Eldar, but one of my friends already plays that army.)
I have just finished my first batch of soldiers. These are Fire Warriors, the basic infantry of the Tau. They can be accompanied by a pair of Gun Drones. This is only part of a squad.
The color scheme is based of the old Ice Planet Lego Sets. So all the infantry will be painted like these fire warriors. I'm not sure about the battle suits, though I will probably be keeping the blue weapons and definitely the orange glowy things. The vehicles, I think, will be primarily blue instead of white.
I'll post more pics as I build the army. I have a lot of models now, but I probably only spend a few hours a week on them. So don't hold your breath.


